Saturday, 3 December 2016

Jems Monthly Blog Hop December

Hello again! Thanks for popping by. This month the blog hop theme is 2016 in Review.

2016 has been so busy hasn't it? It's gone by in such a flash, I can't believe it's December already. I feel like I've not done enough crafting this year with so little spare time to sit and make, but taking a look back through all my pictures I realise I've done more than I thought! So I've gathered together 12 of my favourite makes and event highlights from throughout the year...


Go to the next Blog - Kate Martin
Previous Blog - Lucy V Brown


Saturday, 1 October 2016

Jems Monthly Blog Hop October

This month's blog hop theme is 'All That Glitters' and you may have seen some really sparkly projects already!

Well as usual I am completing my projects right at the last minute, at work, during a quiet spell. I only have access to whatever I managed to throw into my bag as I was running out the house and have not planned any particular thing so really I'm just having a bit of a play. With glitter!

I decided to have a go at heat embossing with glitter. I've never used heat & stick powder before but you use it to add glitter to stamped images instead of embossing powder.

This card is super simple but I love the effect of the dazzling diamonds glitter against the island indigo card. The stamp is from Frosted Medallions. Basic instructions: Stamp with Versamark ink, sprinkle with Heat & Stick powder, heat with the heat tool to melt the powder and turn it sticky, quickly sprinkle with glitter, a quick blast with the heat tool to set!


I love this stamp and wanted to make a Christmas decoration with it. I had a rummage around and found a plastic bauble that was just about the right size to insert the snowflake. I embossed the image on a window sheet with heat & stick powder and added silver glitter, cut it out with the layering circles die  and attached it to the inside of the bauble with a tiny piece of sellotape. I added silver glitter ribbon to the top!


It's so hard to photograph but looks really effective and took only minutes to make.

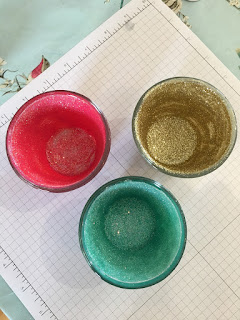
I was still feeling creative so I found some glass tea light holders decided to give them the glitter treatment! I mixed about 15 drops of reinker (I used pool party for this one) with a bit of glue inside the glass. I used decopatch glue but you could use pva watered down a bit - as long as it dries clear it should be fine.


I tipped and turned the glass so that the glue slowly coated the inside of the glass. It has to be a fairly even coating but with no excess that will drip back down while it's drying. I seemed to get the right amount first time and just needed to use a paintbrush to push the glue into a few spots it missed. If you have too much glue you could stand the glass upside down for a few minutes on a paper towel to let any excess drip out.

Then I tipped in a load of dazzling diamonds glitter and swirled it round to cover all the glue, tipping out any excess to put back in the pot.


Then just leave to dry. To seal the glitter I will probably go back and paint over a thin coat of the glue which also acts as a varnish.

I made a melon mambo version and also one with Gold Stampin Glitter (for the gold one I had to go back and add another layer of glue and glitter after the first was dry because it was a bit patchy). You can make them to match your home decor or Christmas colour scheme. It would be so much fun to make a whole rainbow of these!


Right, while I try and de-glitter myself and every surface of my shop, please do check out the next blog in the hop which is Karen's
http://kraftingk.blogspot.co.uk/2016/10/all-that-glitters.html

Or go backwards to Julie's
http://juliesjapes.blogspot.com/2016/10/all-that-glitters-jems-blog-hop.html


See you soon!
Kylie x

Saturday, 3 September 2016

Jems Monthly Blog Hop September

Well it's the start of September which is a very exciting time because Stampin' Up!s new Autumn/Winter catalogue has just gone live! You will probably already have seen loads of gorgeous Christmassy projects, products and ideas online and now you can get your hands on the stuff yourself, or at least start planning your Christmas crafting - it's never too early!

If you've hopped here from Samantha's fantastic page, welcome to my blog! My entry for the Autumn/Winter themed blog hop starts with my number one stamp set bundle in the new catalogue - Cookie Cutter Christmas! The gingerbread man is adorable and I love all the other characters in the set too.


I made a mini garland of gingerbread men to decorate a plain paper bag, and also designed a quick card (this is what my guests will make at my new catalogue party this weekend!).


The matching punch can also be used to make a little snowman with top hat and bow tie! This one got added to a clear tiny treat box filled with mint (or snowman poo if you prefer!). His tiny cane was cut from the Candy Cane Lane designer series papers.


Next up, my second favourite product in the catalogue - the Candy Cane Lane papers - and a card inspired by the sample in the catalogue itself. The houses were cut from the paper sheet!


I have been enjoying playing with my new goodies and I still have a long wish list of things I'd like to purchase! I will try to share more pictures in the coming week

In the meantime, if you'd like to order anything online, go through to my shop page and if you enter the hostess code 9FYX2RTA at the checkout during September I will send you a free card, paper & embellishment pack in the post! 

For now though, continue enjoying the blog hop and go and see what the lovely Julie has in store for you today!


Hop forward to Julie Wade's Blog:

Hop backwards to Samantha Webster's Blog


Saturday, 6 August 2016

Jems Monthly Blog Hop August

Work has been mad of late so I haven't been organised enough to update my blog for a few months. But I wanted to join in the blog hop this month though so I made a special effort!

As you'll have seen if you've followed the hop from another blog the theme this time is boxes, bags and packaging! Well I love to make cute bags and boxes and my Stampin' Up! supplies make it super easy to create very professional looking packaging for gifts and treats.

At my last new catalogue event we made these handbags using the bag-in-a-box method. I used the Pop of Pink papers for these ones, and a cute bow decoration made using the bow builder punch.


Inside the bags we had sweets wrapped in Stampin' Up's gusseted cello bags, tied with a piece of Baker's twine and a small, simple hand made tag (a stamp from the Pop of Paradise set). This took minutes to create and with some colour-coordinated sweets they really look the part!


Everyone who came to the event got a goody bag to take home. I had some plain pink paper bags that I decorated simply with a handmade tag to tie in with the theme! A tag is a really quick way to decorate a boring paper bag if you don't have time to make bags from scratch! I used the Tag Topper punch to make the tags.


 Hope you enjoy hopping round the rest of the blogs and have a lovely weekend!


Jems Blog Hop - August
Sharon Glynn - Shari Anne Happy Crafter
Julie Dix - Scrapping Mojo
Sarah Lavelle - Sarah Lavelle
Amanda Bates - The Craft Spa
Karyn Davies - KD Crafts
Elaine Baines - Lainey B Crafts
Julie Kettlewell - Julie's Japes
Samantha Webster - Sam's Cakes and Crafts
Kylie Henshaw - YOU ARE HERE
Julie Wade - Create Handmade Happiness
Sarah Lindsay - Crafts with Sarah L
Karen Watts - Krafting K
Kate Martin - Krafts by Kate Martin
Linda Ellis - Linda's Papercraft
Gill Arnold - Make Moor Cards
Tracy Hill - Nathan's Tea Room

Saturday, 7 May 2016

Jems Monthly Blog Hop May


Yey! Welcome to a new monthly blog hop by our team of Stampin' Up! demonstrators. You might have hopped here from Sam's blog - in which case - Hello! I'm Kylie!

This month's theme is 'Retiring Products'. Earlier this month when the retirement list was published (the list of all the stamps and accessories that won't be in the next catalogue) I piled up all my stamps that will retire and I pulled out a few that I'm quite attached to - I want to get some more use out of them before deciding whether or not to sell them on!


Flowering Flourishes was one such stamp set. I love this set because it creates the perfect, simple but very effective backgrounds. Add a sentiment and you have a gorgeous card in minutes! It's a favourite of mine for wedding cards and invitations too. Today I want to show you three cards using Flowering Flourishes to create different backgrounds.

Please note this stamp set has already sold out in all formats - however I will be reluctantly parting with mine in my preloved stamp sale on 5th June - please see my events page for details!


The first card is simply stamped in basic grey and white craft ink on a basic grey card base. The sentiment is from another retiring stamp set 'Perfect Pennants' stamped in white craft ink. I've added some butterflies which I had punched from scraps of card that I had practised my stamping on! The addition of Rhinestones gives it an elegant finish!


For my second card I have heat embossed the background with clear embossing powder then sponged over the top with Lost Lagoon ink (One of the retiring 2014-16 in-colours) and more stamping over the top with Lost Lagoon and another Perfect Pennants sentiment.
Another heat embossed card for number three - this time gold embossing powder over Blackberry Bliss (this colour I'll miss a lot!) which I think looks quite classy and luxurious!


Hopefully someone I know will buy it off me so I can borrow it back occasionally! Haha.

Now it's time to click the NEXT BLOG button below to visit Julie's blog - the next one in the Jems Blog Hop, but I hope to see you back here soon!


List of demonstrators participating in the Jems Blog Hop this month:

Sharon Glynn
Sarah-Jane Rae
Julie Dix
Sarah Lavelle
Amanda Bates
Karyn Davies
Julie Kettlewell
Allie Jolliffe
Samantha Webster
Samantha Carlton
Kylie Henshaw - YOU ARE HERE
Julie Wade
Sarah Lindsay
Karen Watts
Gill Arnold
Yvonne Hunt
Kate Martin
Tracy Hill
Lucy Brown

Thursday, 5 May 2016

Zoo babies is gone!

I came to write a little post about a couple of baby cards I made recently with the Zoo Babies stamp set and I've just checked and it's already sold out! Sorry. I still haven't decided if I can part with my set yet but it might be added to my stock of retired products in my preloved stamp sale on 5th June!

Anyway, hope you like these - they also feature a retired stamp set called Celebrate Baby which will be in my sale) and uses up some old papers.

I made two because I didn't know the sex of the baby and I wanted to get organised in advance (people who know me will know this really isn't normal for me!!)


I'll be back on Saturday morning with a special Blog Hop post - so if you've got a quiet half an hour over the weekend you'll need to grab a cup of tea and read all the linked posts from my team of demonstrators! See you then!

Sunday, 24 April 2016

A Nice Cuppa

Yes there's nothing like a nice cup of tea. Tea is an essential part of my day - I can't do anything in the morning without at least one brew and it's integral to all my crafting events! That's why I got very excited about this stamp set and matching dies in the Spring/Summer catalogue.

They really are just my cup of tea, and I've used this bundle plus the coordinating papers a lot for various cards and 3D projects.


One of my Crafternoon Tea projects was a card and a matching gift box that contain teabags and biscuits. I think these would make great teacher gifts, or just to cheer someone up. Note the silver spoon die cut from foil card!


I made a few cards using the same colour scheme. This one below is CASEd (Copy And Share Everything) from another very talented demonstrator Kim Williams in the US (check out her use of crystal effects and pearls to embellish the card further and take it to the next level).


The following two cards were designed by my monthly card class ladies. I provided them with the same materials, plus my own examples and let them create their own version. How beautiful they are!


The A Nice Cuppa stamps and thinlet dies available to purchase from my online store as a bundle, saving you 15%. Please note that they will be retiring when the catalogue ends on 1st June and you won't be able to purchase them after this date. Click here to go to my online shop...

Friday, 22 April 2016

Card Class April 2016

Hi there. This week was my monthly card class and I just wanted to tell you all about them, and show you what we made!

I've been running a monthly card classes for 3 years from my home near Pudsey, West Yorkshire. I also do a repeat of the class at my shop Fox & the Magpie in Shipley.

We usually make 4 different cards (or sometimes 3D projects) that showcase different Stampin' Up! products, stamp sets, punches and dies. We also try out lots of different techniques and styles.

Complete beginners are always welcome and many are surprised at how professional their finished cards look. Some of my regulars are keen crafters and go home with lots of ideas for new things to try. Some don't craft at home but love to take home four handmade cards that they can give away for upcoming occasions. And some just put their cards in a box to take out and admire occasionally and would never dream of giving their beautiful creations away!

Here are some examples of cards made at past classes...


The cards we made this month had a bit of a spring/early summer feel to them - well the sun has been shining this week!

We started with a simple stamped card with a masked centre. The stamp set was Bloomin Love (which isn't just for valentines!). The sentiment in the centre was from the Perfect Banners stamp set and was heat embossed in gold. Please excuse the massive smudge at the top - you know when you ruin a card right at the end and can't be bothered to start again??


Next we used the Awesomely Artistic stamp set which involved layering up different stamps. I showed the ladies how to 'Stamp off' (stamping onto scrap paper first) for a more subtle ink colour and to build up the design on the white background. The dragonflies were coloured using the marker pens to get the multi-coloured effect.


For the third card we played around with the baby wipe technique (which I'll explain more in another post), the Watercolour Wings stamp set and an embossed background! The butterfly thinlits are gorgeous!


Lastly we did a card that had no stamping but lots of die cutting! The coloured flowers (Botanical Blooms Thinlits) really pop against the black and white background. Thanks to Julie Kettlewell for the card design!


If you're interested in coming along to the next card class in May please get in touch - our theme is going to be 'family' so we'll be covering male, female and children's cards. Click here to go to my classes and events page for details...