Tuesday, 2 October 2018

A new craft group

I have recently started leading a new craft group for over 50s at my local community centre in Shipley.

Before the first session I had no idea what to expect, who would come, how many, and what their interests and abilities would be. Coming up with a craft project was easy though - I thought I'd start with what I know - stamping!

Without a proper budget for materials I needed to raid my stash of card stock and design a couple of cards that would be simple enough for the beginner, but impressive enough to please an avid crafter.

The Painted Harvest Stamp Set caught my eye as I browsed my shelves of stamps - the gorgeous Autumnal images are perfect for this time of year.

We did 2 cards and a bookmark and had a go at stamping, punching, embossing and die-cutting.

I had 8 lovely ladies attend the session, some crafters, some not, but and all enjoyed it and all promised to be back in a fortnight!


Now to come up with the next project!

Kylie x


Tuesday, 26 June 2018

Dandelion Wishes Watercolour Rainbow

I have been prepping for my upcoming Dandelion Wishes class and really enjoying myself playing with this gorgeous Stamp Set. It has become a recent favourite.


I decided to have a go at embossing the dandelions with clear embossing powder onto watercolour paper and going crazy with the inks! This is what happened....


An unplanned but surprisingly good result!


I make use of my larger acrylic blocks to drop the reinkers onto - easy to clean afterwards too.


To get the drip effect I just added more water and ink to the dandelion heads, held up the paper and let gravity do the work!


Once dried I mounted the watercolour paper simply onto white and black cardstock, but I think I will look for a proper frame.


Monday, 14 August 2017

Christmas in August

It's that time of year when our crafting starts to turn a bit more festive. As demonstrators we get to see what's coming before everyone else and most of us have already devoured the upcoming Autumn/Winter catalogue and even got our hands on some wonderful christmas products early. I've been so excited to play with my new goodies and have already completed a 3D project that I will be running as a class later in the year.

Would you like a sneak peek??

Thought so...


If you'd like me to send you a new Autumn/Winter catalogue, please send me an email to request one, with your address. You'll get it in the post together with some sneak peek new product samples!

hellostamper@gmail.com

For free gift when you spend £25+ in my online shop during August, enter the Hostess Code FMWEZYNA at the checkout

Monday, 10 April 2017

Retiring Products up to 50% off

Evening everyone. Just a quick update to let you know Stampin' Up!s annual clear-out ahead of the new catalogue coming in June has started tonight!

A whole list of products, some with a discount, are on the website and only available while stocks last.

This could be your last chance to get that stamp set or punch you've had your eye on for a while, or to stock up on the 2015-17 in-colours.

Head over to the retirement list now and get your order in quick. If ordering online use the Hostess Code C2KH22CR at the checkout and receive a free gift from me in the post.

Click here to see all retiring products


Saturday, 3 December 2016

Jems Monthly Blog Hop December

Hello again! Thanks for popping by. This month the blog hop theme is 2016 in Review.

2016 has been so busy hasn't it? It's gone by in such a flash, I can't believe it's December already. I feel like I've not done enough crafting this year with so little spare time to sit and make, but taking a look back through all my pictures I realise I've done more than I thought! So I've gathered together 12 of my favourite makes and event highlights from throughout the year...


Go to the next Blog - Kate Martin
Previous Blog - Lucy V Brown


Saturday, 1 October 2016

Jems Monthly Blog Hop October

This month's blog hop theme is 'All That Glitters' and you may have seen some really sparkly projects already!

Well as usual I am completing my projects right at the last minute, at work, during a quiet spell. I only have access to whatever I managed to throw into my bag as I was running out the house and have not planned any particular thing so really I'm just having a bit of a play. With glitter!

I decided to have a go at heat embossing with glitter. I've never used heat & stick powder before but you use it to add glitter to stamped images instead of embossing powder.

This card is super simple but I love the effect of the dazzling diamonds glitter against the island indigo card. The stamp is from Frosted Medallions. Basic instructions: Stamp with Versamark ink, sprinkle with Heat & Stick powder, heat with the heat tool to melt the powder and turn it sticky, quickly sprinkle with glitter, a quick blast with the heat tool to set!


I love this stamp and wanted to make a Christmas decoration with it. I had a rummage around and found a plastic bauble that was just about the right size to insert the snowflake. I embossed the image on a window sheet with heat & stick powder and added silver glitter, cut it out with the layering circles die  and attached it to the inside of the bauble with a tiny piece of sellotape. I added silver glitter ribbon to the top!


It's so hard to photograph but looks really effective and took only minutes to make.

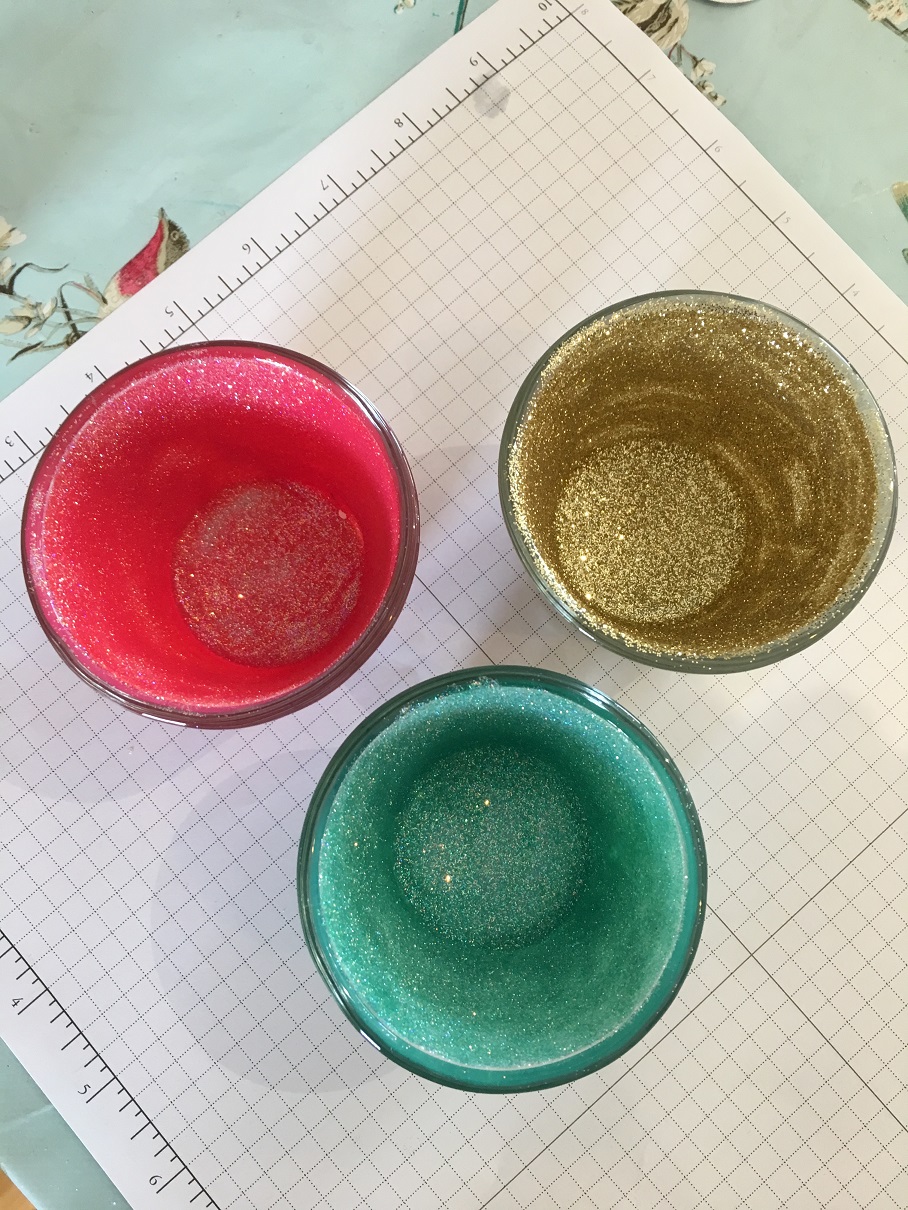
I was still feeling creative so I found some glass tea light holders decided to give them the glitter treatment! I mixed about 15 drops of reinker (I used pool party for this one) with a bit of glue inside the glass. I used decopatch glue but you could use pva watered down a bit - as long as it dries clear it should be fine.


I tipped and turned the glass so that the glue slowly coated the inside of the glass. It has to be a fairly even coating but with no excess that will drip back down while it's drying. I seemed to get the right amount first time and just needed to use a paintbrush to push the glue into a few spots it missed. If you have too much glue you could stand the glass upside down for a few minutes on a paper towel to let any excess drip out.

Then I tipped in a load of dazzling diamonds glitter and swirled it round to cover all the glue, tipping out any excess to put back in the pot.


Then just leave to dry. To seal the glitter I will probably go back and paint over a thin coat of the glue which also acts as a varnish.

I made a melon mambo version and also one with Gold Stampin Glitter (for the gold one I had to go back and add another layer of glue and glitter after the first was dry because it was a bit patchy). You can make them to match your home decor or Christmas colour scheme. It would be so much fun to make a whole rainbow of these!


Right, while I try and de-glitter myself and every surface of my shop, please do check out the next blog in the hop which is Karen's
http://kraftingk.blogspot.co.uk/2016/10/all-that-glitters.html

Or go backwards to Julie's
http://juliesjapes.blogspot.com/2016/10/all-that-glitters-jems-blog-hop.html


See you soon!
Kylie x

Saturday, 3 September 2016

Jems Monthly Blog Hop September

Well it's the start of September which is a very exciting time because Stampin' Up!s new Autumn/Winter catalogue has just gone live! You will probably already have seen loads of gorgeous Christmassy projects, products and ideas online and now you can get your hands on the stuff yourself, or at least start planning your Christmas crafting - it's never too early!

If you've hopped here from Samantha's fantastic page, welcome to my blog! My entry for the Autumn/Winter themed blog hop starts with my number one stamp set bundle in the new catalogue - Cookie Cutter Christmas! The gingerbread man is adorable and I love all the other characters in the set too.


I made a mini garland of gingerbread men to decorate a plain paper bag, and also designed a quick card (this is what my guests will make at my new catalogue party this weekend!).


The matching punch can also be used to make a little snowman with top hat and bow tie! This one got added to a clear tiny treat box filled with mint (or snowman poo if you prefer!). His tiny cane was cut from the Candy Cane Lane designer series papers.


Next up, my second favourite product in the catalogue - the Candy Cane Lane papers - and a card inspired by the sample in the catalogue itself. The houses were cut from the paper sheet!


I have been enjoying playing with my new goodies and I still have a long wish list of things I'd like to purchase! I will try to share more pictures in the coming week

In the meantime, if you'd like to order anything online, go through to my shop page and if you enter the hostess code 9FYX2RTA at the checkout during September I will send you a free card, paper & embellishment pack in the post! 

For now though, continue enjoying the blog hop and go and see what the lovely Julie has in store for you today!


Hop forward to Julie Wade's Blog:

Hop backwards to Samantha Webster's Blog