Well as usual I am completing my projects right at the last minute, at work, during a quiet spell. I only have access to whatever I managed to throw into my bag as I was running out the house and have not planned any particular thing so really I'm just having a bit of a play. With glitter!
I decided to have a go at heat embossing with glitter. I've never used heat & stick powder before but you use it to add glitter to stamped images instead of embossing powder.
This card is super simple but I love the effect of the dazzling diamonds glitter against the island indigo card. The stamp is from Frosted Medallions. Basic instructions: Stamp with Versamark ink, sprinkle with Heat & Stick powder, heat with the heat tool to melt the powder and turn it sticky, quickly sprinkle with glitter, a quick blast with the heat tool to set!
I love this stamp and wanted to make a Christmas decoration with it. I had a rummage around and found a plastic bauble that was just about the right size to insert the snowflake. I embossed the image on a window sheet with heat & stick powder and added silver glitter, cut it out with the layering circles die and attached it to the inside of the bauble with a tiny piece of sellotape. I added silver glitter ribbon to the top!
It's so hard to photograph but looks really effective and took only minutes to make.
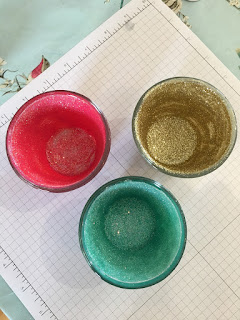
I was still feeling creative so I found some glass tea light holders decided to give them the glitter treatment! I mixed about 15 drops of reinker (I used pool party for this one) with a bit of glue inside the glass. I used decopatch glue but you could use pva watered down a bit - as long as it dries clear it should be fine.
I tipped and turned the glass so that the glue slowly coated the inside of the glass. It has to be a fairly even coating but with no excess that will drip back down while it's drying. I seemed to get the right amount first time and just needed to use a paintbrush to push the glue into a few spots it missed. If you have too much glue you could stand the glass upside down for a few minutes on a paper towel to let any excess drip out.
Then I tipped in a load of dazzling diamonds glitter and swirled it round to cover all the glue, tipping out any excess to put back in the pot.
Then just leave to dry. To seal the glitter I will probably go back and paint over a thin coat of the glue which also acts as a varnish.
I made a melon mambo version and also one with Gold Stampin Glitter (for the gold one I had to go back and add another layer of glue and glitter after the first was dry because it was a bit patchy). You can make them to match your home decor or Christmas colour scheme. It would be so much fun to make a whole rainbow of these!
http://kraftingk.blogspot.co.uk/2016/10/all-that-glitters.html
Or go backwards to Julie's
http://juliesjapes.blogspot.com/2016/10/all-that-glitters-jems-blog-hop.html
See you soon!
Kylie x


Great card Kylie, I do love a bit of Heat and Stick too! But your bauble? LOVE that! So pretty :-) and great little candle holders too, you're so very creative xx
ReplyDeleteLove the tea lights xx
ReplyDeleteFabulous projects Kylie... I can imagine how covered you were with glitter after these!!!
ReplyDeleteLovely makes Kylie. x
ReplyDeleteHaven't got this set, its been near the top of my list for a while, think I might have to push it onto an order form now. Lovely makes Kylie k x
ReplyDeleteI love you bauble!!! Such a fab idea. Looks super classy and sparkly. All great makes.
ReplyDeleteGreat Projects thanks for sharing, time for the heat and stick to surface with the glitters
ReplyDeleteThese are all fab Kylie! I particularly like the little glittery tea light glasses. Very clever!
ReplyDelete